En esta oportunidad mostraremos como conectar a MySQL desde PHP, en el tema anterior mostramos como conseguir y activar el soporte de MySQL y PHP en nuestro espacio web de Miarroba.com.
Tema anterior: Activar soporte de MySql en Miarroba
Es momento de mostrar la estructura de la Base de datos y tabla a la cual haremos conexion.
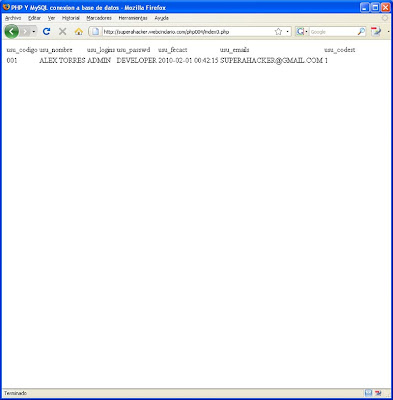
Ahora es momento de generar nuestro PHP que haga la conexion a MySQL y Extraiga los datos de una consulta y los muestre en pantalla.
Y tendriamos la siguiente ventana como pueden apreciar esta imagen si quieren pueden ingresar al siguiente URL: http://superahacker.webcindario.com/php004/index0.php.
Entonces este tema seria como los tantos que existen en internet; pero en este blog me esfuerzo por marcar la diferencia.
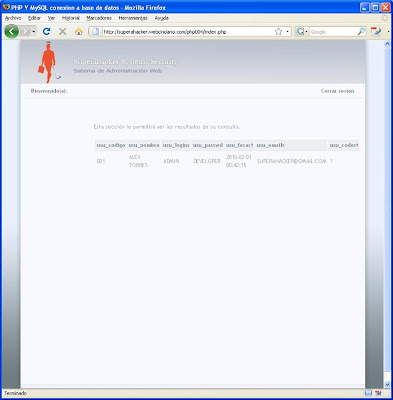
Aprender PHP no lo es todo, si antes no vimos HTML, CSS, JSCRIPT, DHTML,XML. Casi todo entra por los ojos. entonces transformemos esta la idea agregandole algo de estilo usemos CSS en este caso y veamos como quedaria nuestro PHP.
Como cambio hasta yo me sorprendo, del poder de un buen diseño usando CSS, pueden revisarlo en este URL: http://superahacker.webcindario.com/php004/index.php
Ahora si que marcamos la diferencia, ahora si es necesario explicar el CSS comente sus dudas.
Tema anterior: Activar soporte de MySql en Miarroba
Es momento de mostrar la estructura de la Base de datos y tabla a la cual haremos conexion.
CREATE DATABASE superahacker

CREATE TABLE sumausu
( usu_codigo char(3) NOT NULL,
usu_nombre varchar(20) default NULL,
usu_logins varchar(15) default NULL,
usu_passwd varchar(15) default NULL,
usu_fecact datetime default NULL,
usu_emails varchar(25) default NULL,
usu_codest char(1) default NULL,
PRIMARY KEY  (`usu_codigo`))

INSERT INTO sumausu VALUES
('001','ALEX TORRES','ADMIN','DEVELOPER','SUPERAHACKER@GMAIL.COM','02-01-2010','1')
Ahora es momento de generar nuestro PHP que haga la conexion a MySQL y Extraiga los datos de una consulta y los muestre en pantalla.
<html>
<head>
<title>PHP Y MySQL conexion a base de datos</title>
</head>
<body>
<?php
//Conexion MySQL
$link=mysql_connect('mysql.webcindario.com:3306','superahacker','password');

mysql_select_db('superahacker',$link); //-Seleccion Database
$result=mysql_query('select * from sumausu');//-Consulta

$field = mysql_num_fields( $result ); //-Número de COlumnas

// resultado
echo '<table border="0">';
//Mostrando los nombres de Columnas
for ( $i = 0; $i < $field; $i++ ) {
echo '<td class="tdgridtit">'.mysql_field_name( $result, $i ).'</td>';
}
//Mostrando Registros
while($row=mysql_fetch_array($result)){
echo '<tr>';
for ( $i = 0; $i < $field; $i++ ) {      echo '<td class="tdgridlbl">'.$row[$i].'</td>';
}
echo '</tr>';
}
echo '</table>';
//Cerrando la Conexion
mysql_close($link);
?>
</body>
</html>
Y tendriamos la siguiente ventana como pueden apreciar esta imagen si quieren pueden ingresar al siguiente URL: http://superahacker.webcindario.com/php004/index0.php.

Entonces este tema seria como los tantos que existen en internet; pero en este blog me esfuerzo por marcar la diferencia.
Aprender PHP no lo es todo, si antes no vimos HTML, CSS, JSCRIPT, DHTML,XML. Casi todo entra por los ojos. entonces transformemos esta la idea agregandole algo de estilo usemos CSS en este caso y veamos como quedaria nuestro PHP.
<html>
<head>
<title>PHP Y MySQL conexion a base de datos</title>
<style>
body {
margin-top: 0px;
margin-right: 0px;
margin-bottom: 0px;
margin-left: 0px;
background-image: url(../images/bg.jpg);
background-color: #707D83;
background-repeat:  repeat-x;

}
.header {
background-color: #E8ECF1;
background-image: url(../images/bgheader1.jpg);
}
.link {
font-family: "Trebuchet MS", Verdana, Arial;
font-size: 12px;
font-weight: bold;
text-decoration: none;
color: #7E8992;
}
.link:hover {
font-family: "Trebuchet MS", Verdana, Arial;
font-size: 12px;
font-weight: bold;
text-decoration: underline;
color: #7E8992;
}
.menu {
font-family: "Trebuchet MS", Verdana, Arial;
font-size: 14px;
font-weight: bold;
text-decoration: none;
color: #3E484A;
border-right-width: 12px;
border-left-width: 12px;
border-right-style: solid;
border-left-style: solid;
border-right-color: #F8F9FE;
border-left-color: #F8F9FE;
background-color: #E6E8EC;
border-bottom-width: 1px;
border-bottom-style: solid;
border-bottom-color: #F8F9FE;
padding-left: 12px;
}
.text {
font-family: "Trebuchet MS", Verdana, Arial;
font-size: 12px;
font-weight: normal;
color: #99A2A9;
text-decoration: none;
border-left-width: 12px;
border-left-style: solid;
border-left-color: #F8F9FE;
border-right-width: 12px;
border-right-style: solid;
border-right-color: #F8F9FE;
padding-left: 8px;
}
.tdsupIzp {

font-family: "Trebuchet MS", Verdana, Arial;
font-size: 12px;
font-weight: bold;
color: #7E8992;
text-decoration: none;
border-bottom-width: 1px;
border-bottom-style: solid;
border-bottom-color: #E2E4E7;
border-right-width: 0px;
border-left-width: 12px;
border-right-style: solid;
border-left-style: solid;
border-right-color: #F8F9FE;
border-left-color: #F8F9FE;
padding-left: 12px;
}
.tdsupDer {
font-family: "Trebuchet MS", Verdana, Arial;
font-size: 12px;
font-weight: bold;
color: #7E8992;
text-decoration: none;
border-bottom-width: 1px;
border-bottom-style: solid;
border-bottom-color: #E2E4E7;
border-right-width: 12px;
border-left-width: 0px;
border-right-style: solid;
border-left-style: solid;
border-right-color: #F8F9FE;
border-left-color: #F8F9FE;
padding-right: 12px;
}
.tdgridtit {
font-family: "Trebuchet MS", Verdana, Arial;
font-size: 12px;
font-weight: bold;
color: #7E8992;
text-decoration: none;
padding-top: 3px;
padding-bottom: 3px;
border-bottom-width: 1px;
border-bottom-style: solid;
border-bottom-color: #E2E4E7;
background-color: #ECEEF0;
padding-left: 5px;
}
.tdgridlbl {
font-family: "Trebuchet MS", Verdana, Arial;
font-size: 12px;
font-weight: normal;
color: #99A2A9;
text-decoration: none;
padding-top: 3px;
padding-bottom: 3px;
border-bottom-width: 1px;
border-bottom-style: solid;
border-bottom-color: #F8F9FE;
padding-left: 5px;
}
.copy {
font-family: "Trebuchet MS", Verdana, Arial;
font-size: 12px;
font-weight: normal;
color: #7E8992;
text-decoration: none;
padding: 6px;
border-top-width: 1px;
border-top-style: solid;
border-top-color: #FFFFFF;
background-image: url(../images/bgcopy.jpg);
}
.copy a {
font-weight: bold;
color: #777777;
text-decoration: none;
}
.copy a:hover {
font-weight: bold;
color: #777777;
text-decoration: underline;
}
</style>
</head>
<body>
<table width="800" height="100%" border="0" align="center" cellpadding="0" cellspacing="0">
<tr>
<td valign="top" background="../images/xbgizq.jpg"><img src="../images/bgizq.jpg" width="15" height="768"></td>
<td height="100%" valign="top" background="../images/bgtab.jpg">
<table width="770" border="0" align="center" cellpadding="0" cellspacing="0">
<tr>
<td height="98" colspan="2" class="header"> </td>
</tr>
<tr>
<td height="32" colspan="2" valign="middle">
<table width="100%" height="100%" border="0" cellpadding="0" cellspacing="0">
<tr>
<td width="78%" align="left" valign="middle" class="tdsupIzp">Bienvenido(a): </td>
<td width="22%" align="right" valign="middle" class="tdsupDer"><a href="#" class="link">Cerrar sesión</a> </td>
</tr>
</table>
</td>
</tr>
<tr>
<td width="180" rowspan="4" align="center" valign="top"><!-- AREA MENU--></td>
<td width="590" height="10"><img src="../images/spacer.gif"></td>
</tr>
<tr>
<td height="30" align="left" valign="middle"><table width="100%" height="28" border="0" cellpadding="0" cellspacing="0">
<tr>
<td width="73%" height="30" align="left" valign="middle" class="tdtitizq"><!-- AREA DATOS--></td>
<td width="27%" height="30" align="right" valign="middle" class="tdtitder"> </td>
</tr>
</table>
</td>
</tr>
<tr>
<td height="15"><img src="../images/spacer.gif"></td>
</tr>
<tr>
<td height="400" valign="top" class="text">
<div>Esta sección le permitirá ver los resultados de su consulta.</div>
<br>

<?php
//Conexion MySQL
$link=mysql_connect('mysql.webcindario.com:3306','superahacker','password');

mysql_select_db('superahacker',$link); //-Seleccion Database
$result=mysql_query('select * from sumausu');//-Consulta

$field = mysql_num_fields( $result ); //-Número de Columnas

// resultado
echo '<table border="0">';
//Mostrando los nombres de Columnas
for ( $i = 0; $i < $field; $i++ ) {
echo '<td class="tdgridtit">'.mysql_field_name( $result, $i ).'</td>';
}
//Mostrando Registros
while($row=mysql_fetch_array($result)){
echo '<tr>';
for ( $i = 0; $i < $field; $i++ ) {
echo '<td class="tdgridlbl">'.$row[$i].'</td>';
}
echo '</tr>';
}
echo '</table>';
//Cerrando la Conexion
mysql_close($link);
?>

</td>
</tr>
</table>   </td>
<td valign="top" background="../images/xbgder.jpg"><img src="../images/bgder.jpg" width="15" height="768"></td>
</tr>
<tr>
<td valign="top" background="../images/xbgizq.jpg"> </td>
<td height="26" align="center" background="../images/bgtab.jpg" class="copy">
©2010 Superahacker Systems Security All Right Reserved - Developed by <a href="http://superahacker.blogspot.com">Superah@cker</a>
</td>
<td valign="top" background="../images/xbgder.jpg"> </td>
</tr>
</table>
</body>
</html>
Como cambio hasta yo me sorprendo, del poder de un buen diseño usando CSS, pueden revisarlo en este URL: http://superahacker.webcindario.com/php004/index.php

Ahora si que marcamos la diferencia, ahora si es necesario explicar el CSS comente sus dudas.
Excelente muchas gracias por el tutorial.
ResponderBorrarActualmente ando buscando un buen Hosting con PHP 8, para hacer algunas cosas, pero me es complicado encontrarlo.
saludos